Django4.1速通
安装Django
下载安装
建议使用anaconda单独创建环境使用,不想麻烦或者不需要可直接pip安装
1
2
3
python -m pip
install
 Django
验证安装
1
2
3
4
python
 -m django --version
.
.
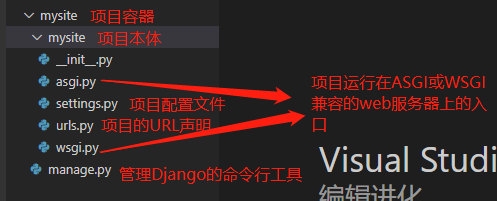
创建项目
1
django-admin startproject mysite
启动服务
1
2
3
4
5
6
7
8
9
10
11
12
13
14
15
16
17
18
19
cd
 mysite  # 外层的mysite
python
 manage.
py
 runserver
# 如需修改端口或IP,在后面自行修改
python
 manage.
py
 runserver
python
 manage.
py
 runserver
.0
.
.0
:
访问页面
1
2
3
4
5
6
7
http:
//
.0
.
.1
:
/

创建应用
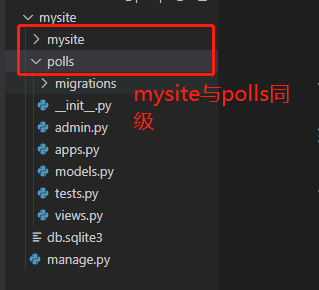
应用与项目的概念:应用是专门做某件事的程序,如博客系统、投票程序,项目是一个网站使用的配置和应用的集合,项目可以包含多个应用,应用可以被多个项目使用。
将应用创建在和manage.py文件统计目录下,方便作为顶级模块导入。也就是说mysite项目和polls项目是同级的。
1
2
3
4
python
 manage.
py
 startapp polls
添加视图
编写视图 :在polls/views.py中填写
1
2
3
4
5
6
7
8
9
10
11
12
13
from
 django.http
import
 HttpResponse
def
index
(
request
):
return
 HttpResponse(
"Hello, world. You're at the polls index."
)
编写应用URLconf :在polls中添加urls.py文件,将index视图添加进投票应用的URLconf
1
2
3
4
5
6
7
8
9
10
11
12
13
14
15
16
17
18
19
20
from
 django.urls
import
 path
from
 .
import
 views
urlpatterns = [
'''
    route::可以是一个字符串、带角括号的字符串或转换器
    view::一个视图函数,或者是include函数
    name::可选参数,可在其他地方引用
    '''
    path(
''
, views.index, name=
'index'
),
]
导入根URLconf :在根 URLconf 文件中指定创建的polls.urls模块,在urlpatterns列表中插入一项。注意引入include模块
1
2
3
4
5
6
7
8
9
10
11
12
13
14
15
16
17
urlpatterns = [
    #
include
 允许引用其他URlconf,实现即插即用
    path(
'polls/'
,
include
(
'polls.urls'
)),
    path(
'admin/'
,
admin
.site.urls),
]
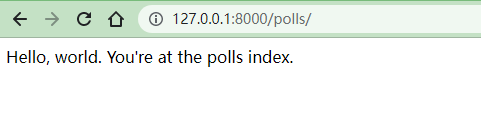
访问视图
1
2
3
4
http:
//
localhost:
/polls/
配置数据库
django默认使用SQLite为默认数据库(Python内置SQLite),在mysite/settings.py中配置了这点:
1
2
3
4
5
6
7
8
9
10
11
12
13
14
15
16
DATABASES
 = {
'default'
: {
'ENGINE'
:
'django
.db.backends.sqlite3',
'NAME'
:
BASE_DIR
 /
'db
.sqlite3',
    }
}
我这里使用的是自己服务器上的Mysql,配置如下:
1
2
3
4
5
6
7
8
9
10
11
DATABASES = {
    'default': {
        'ENGINE': 'django.db.backends.mysql',
        'NAME':'库名',
        'USER':'用户名',
        'PASSWORD':'Mysql登录密码',
        'HOST':'mysql所在机器IP',
        'PORT':'
',
    }
}
根据mysite/settings.py中的数据库配置 和该文件所配置的应用 提供的数据库迁移文件 ,并创建必要的数据库表。如下图所示
1
2
3
4
python
 manage.
py
 migrate
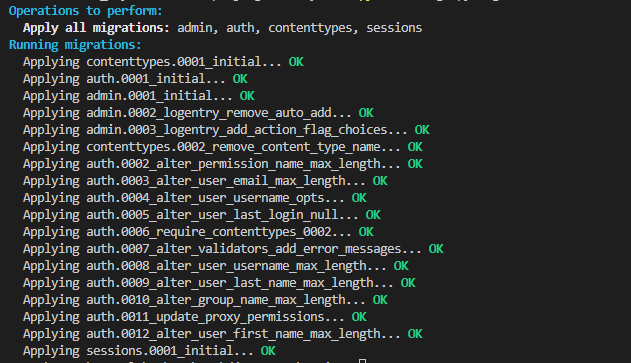
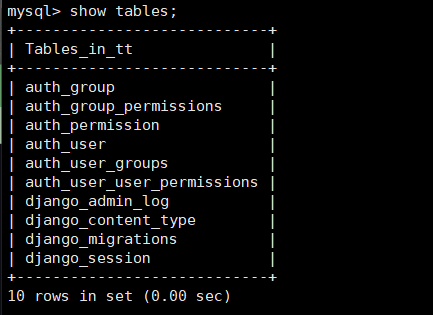
这些表对应的是配置文件中的这些应用:
1
2
3
4
5
6
7
8
9
10
11
12
13
14
15
INSTALLED_APPS
 = [
'django
.contrib.admin',
'django
.contrib.auth',
'django
.contrib.contenttypes',
'django
.contrib.sessions',
'django
.contrib.messages',
'django
.contrib.staticfiles',
]
这里说明一下迁移这个操作。刚开始学的时候我也不太明白这个新概念,多看几遍官方文档后基本能理解了。迁移是Django对于模型定义的变化 的存储形式,也就是说你更新一次模型,就需要执行一次迁移操作,否则模型和数据库就不匹配了。迁移代码是由模型文件自动生成的,本质上是个历史记录,Django通过迁移对数据库进行滚动更新,使其和当前的模型匹配。
创建基于数据库的web应用
投票应用的成品大概长这样。允许创建多个问题,每个问题有多个选项,点击问题后展示问题选项和投票按钮。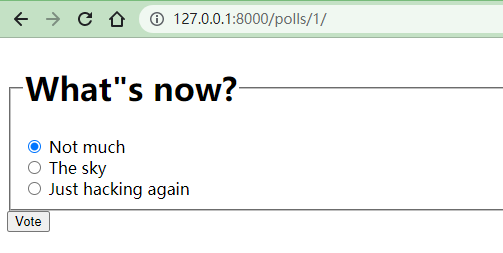
点击投票即可保存投票次数至数据库,投票结束后展示当前投票次数。
创建模型
Django 中的 web 应用不需要手动通过SQL语句去创建表,而是通过模型 来定义数据的信息源。当前应用需要两个模型:问题Question和选项Choice。Question 模型包括问题描述和发布时间。Choice 模型有两个字段,选项描述和当前得票数,每个选项属于一个问题。应用的模型都定义在 polls/models.py 中
1
2
3
4
5
6
7
8
9
10
11
12
13
14
15
16
17
18
19
20
21
22
23
24
25
26
27
28
29
30
31
32
33
class
Question(
models
.Model)
:
    question_text = models.
CharField(
max_length
=200)
    pub_date = models.
DateTimeField('
date
published
')
class
Choice(
models
.Model)
:
    question = models.
ForeignKey(Question,
on_delete
=
models
.CASCADE)
    choice_text = models.
CharField(
max_length
=200)
    votes = models.
IntegerField(
default
=0
每个模型都是django.db.models.Model的子类,一个模型都有多个类变量,每个类变量表示一个数据库字段。而每个字段都是Field类的实例。通过这些模型的配置,Django就可以为该应用创建数据表了
概念对应关系
子类 ——> 模型 ——>数据表
类变量——> Filed 类实例——>表字段
类实例(对象)——>数据表记录
类实例和SQL数据类型对应关系
| Filed 类实例 | SQL类型 |
|---|---|
| models.CharField | varchar |
| models.DateTimeField | datetime |
| models.IntegerField | integer |
| models.ForeignKey | foreign key |
| …… | …… |
激活模型
Django本身是自带了许多应用的,在mysite/setting.py中的INSTALLED_APPS字段可以看到。新创建的投票应用也需要添加进这个列表中,将PollsConfig类所在文件的点式路径添加进去
1
2
3
4
5
6
7
8
9
10
11
12
13
14
15
16
17
18
19
INSTALLED_APPS
 = [
'polls
.apps.
PollsConfig'
,  # 自己的应用
'django
.contrib.admin',
'django
.contrib.auth',
'django
.contrib.contenttypes',
'django
.contrib.sessions',
'django
.contrib.messages',
'django
.contrib.staticfiles',
]
添加之后项目就包含了polls应用,通过makemigrations命令,Django会检测你对模型文件的修改 ,并将修改部分存储为一次迁移。
1
2
3
4
python
 manage.
py
 makemigrations polls

迁移数据被存储在 polls/migrations/0001_initial.py 里,通过sqlmigrate命令可以查看对应的SQL。可以看到为两个新建的模型分别创建了两个数据表,并对polls_choice添加了主键约束。
注意:makemigrations命令只是新增了一次迁移,sqlmigrate命令根据迁移数据把SQL语句输出到屏幕,让你看看Django认为需要执行哪些SQL语句,而并没有真正执行这些语句 。此时你可以去数据库里看一下,并没有这两个表。
1
2
3
4
5
6
7
8
9
10
11
12
13
14
15
16
17
18
python manage.py sqlmigrate polls 0001
--
-- Create model Question
--
CREATE TABLE `polls_question` (`id` bigint AUTO_INCREMENT NOT NULL PRIMARY KEY, `question_text` varchar(200) NOT NULL, `pub_date` datetime(6) NOT NULL);
--
-- Create model Choice
--
CREATE TABLE
`polls_choice`
 (
`id`
 bigint AUTO
_INCREMENT NOT NULL PRIMARY KEY, `choice_text` varchar(200) NOT NULL, `votes` integer NOT NULL, `question_id` bigint NOT NULL);
ALTER TABLE `polls_choice` ADD CONSTRAINT `polls_choice_question_id_c5b4b260_fk_polls_question_id` FOREIGN KEY (`question_id`) REFERENCES `polls_
question
` (`
id`);
真正执行创建表的命令还是migration,它选中所有还没有执行过的迁移并应用在数据库上 ,也就是同步至数据库。
1
2
3
4
python
 manage.
py
 migrate


修改模型只需这三步:
- 编辑
models.py文件,修改模型 - 运行
python manage.py makemigrations xxx为模型的更改生成迁移文件 - 运行
python manage.py migrate根据迁移文件进行数据库迁移(同步数据库)
其他数据库API可参考:传送门
应用后台管理
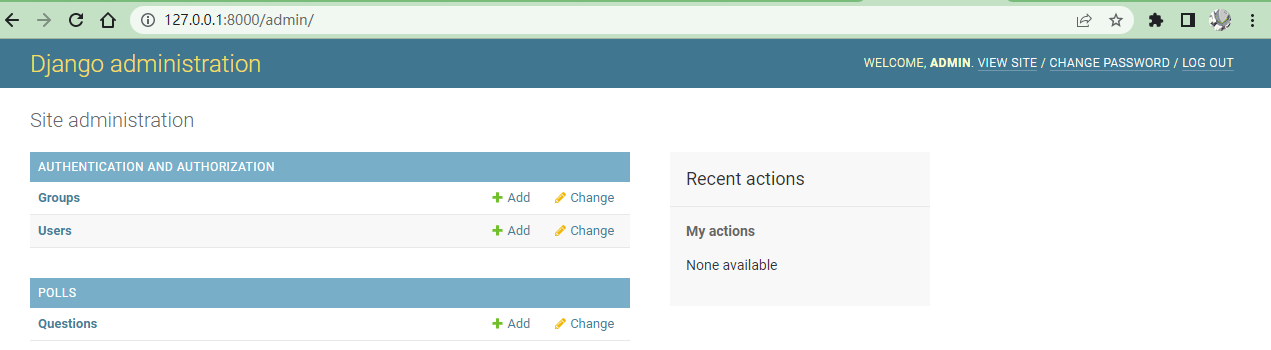
模型激活后,数据库中已经有了相应的数据。为了管理员可以更方便地管理应用,django还会根据模型自动创建后台界面。Django的setting.py中已经自带了admin相关的应用,但还需要创建管理员账号。
1
2
3
4
python
 manage.
py
 createsuperuser
依次输入用户名、邮箱和密码(2次)即可创建完成
1
2
3
4
5
6
7
8
9
10
11
Username:
admin
Email address:
admin
@example.com
Password
: **********
Password
 (again): *********
Superuser
 created successfully.
接下来需要把刚创建好的投票应用注册进后台,在polls/admin中添加代码
1
2
3
4
5
6
from
 .models
import
 Question
admin
.site.register(Question)
注册完成后python manage.py runserver启动服务器,在管理员登录页面输入用户名密码,即可登录到站点管理页面。点击Question进入数据表单页面,该表单是根据模型自动生成的。
1
2
3
4
5
6
7
http:
//
.0
.
.1
:
/admin/
应用开发
创建模型只是定义了一个数据的信息源,相当于mvc架构中的Model,而View和Controller还没有定义。Django中的网页和其他内容都是视图派生来的,每个视图表现为一个函数。根据请求的url来选择使用哪个视图。在Django中使用URLconf来配置关联URl和视图
Django处理请求的基本流程
在polls/views.py中添加视图:
1
2
3
4
5
6
7
8
9
10
11
12
13
14
15
16
17
18
19
20
def
detail
(
request, question_id
):
return
 HttpResponse(
"You're looking at question %s."
 % question_id)
# 输出id用于占位
def
results
(
request, question_id
):
    response =
"You're looking at the results of question %s."
# 输出id用于占位
return
 HttpResponse(response % question_id)
将新视图添加至polls/urls.py模块:
1
2
3
4
5
6
7
8
9
10
11
12
13
14
15
16
17
18
19
20
21
22
23
24
25
26
27
28
29
30
urlpatterns = [
    path(
'index/'
, views.
index
,
name
=
'index'
),
    # 尖括号将匹配到的结果当做关键字参数发送给视图函数,
int
为转换为
int
类型
    path(
'<int:question_id>/'
, views.detail,
name
=
'detail'
),
    path(
'<int:question_id>/results/'
, views.results,
name
=
'results'
),
]
当浏览器访问http://127.0.0.1:8000/polls/34/时,Django会根据mysite/setting.py中ROOT_URLCONF字段的设置,加载mysite/urls模块,并找到该模块中的urlpatterns变量按顺序匹配正则。/polls/34/匹配到了polls/,然后将剩下的34/继续发送至polls/urls这个URLconf 中做进一步匹配,这里的34/在polls/urls中匹配到了'<int:question_id>/',就直接开始调用了views.detail视图,并传递一个HttpRequest实例和其他参数
简而言之,步骤就是:
- Django 通过配置文件匹配请求中的url
- 匹配成功则调用相关视图,匹配不成功则抛出错误
视图开发
一个视图必须做两件事,Django也只要求返回的是这两件事:
- 返回一个包含被请求页面内容的 HttpResponse 对象
- 出一个异常,比如 Http404
视图+模板展示数据
添加模板
在polls应用根目录下添加两层目录,并添加index.html模板,路径为polls/templates/polls/index.html。这样分层的目的是防止多个应用下模板重名,使得Django无法区分,放置在各自命名空间可以避免这个问题,并且Django可以以polls/index.html来引用到该模板。
注:这里的<a href="{% url 'polls:detail' question.id %}">中的polls:detail引用的是polls/urls.py中所配置的app_name变量和urlpatterns列表所定义的path中的name参数。
更多模板语法参考官方文档[TODO]:https://docs.djangoproject.com/zh-hans/4.1/topics/templates/
1
2
3
4
5
6
7
8
9
10
11
12
13
14
15
16
17
18
19
20
21
22
23
24
25
26
27
28
29
30
31
32
33
34
35
36
37
38
39
40
41
42
43
44
45
46
47
48
49
50
{%
if
 latest_question_list %}
<
ul
>
{%
for
 question
in
 latest_question_list %}
<
li
>
<
a
href
=
"
{%
url
 'polls:detail' question.id %}
"
>
{{ question.question_text }}
</
a
>
</
li
>
{%
endfor
 %}
</
ul
>
{%
else
 %}
<
p
>
No polls are available.
</
p
>
{%
endif
 %}
修改视图
修改polls/views.py中的index视图内容。这里的render()将载入polls/index.html模板文件并填充上下文,返回一个HttpResponse对象,这跟其他视图(例如detail)所做的新建HttpResponse操作是等效的。
1
2
3
4
5
6
7
8
9
10
11
12
13
14
15
16
17
def
index
(
request
):
    latest_question_list = Question.objects.order_by(
'-pub_date'
)[
:
]
    context = {
'latest_question_list'
: latest_question_list}
return
 render(request,
'polls/index.html'
, context)
前端访问http://127.0.0.1:8000/polls/index/,展示index视图中所需要的数据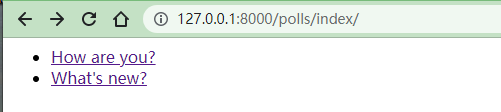
错误处理
快捷抛出404错误:
get_object_or_404():该函数将模型和参数传递给get()( get 只获取一条记录),如果结果为空则触发Http404异常
get_list_or_404():该函数将模型和参数传递给filter(),如果查询结果集为空则触发Http404异常
1
2
3
4
5
6
7
8
9
10
11
12
def
detail
(
request, question_id
):
    question = get_object_or_404(Question, pk=question_id)
return
 render(request,
'polls/detail.html'
, {
'question'
: question})
表单开发
表单的本质是一个 HTML 的<from>元素。 {% for ...%}将展示所有当前Question的Choice,当点击提交按钮时,这个from会发送一个POST请求,data为choice=$choice.id$
如下是polls/details.html内容
1
2
3
4
5
6
7
8
9
10
11
12
13
14
15
16
17
18
19
20
21
22
23
24
25
26
27
28
29
30
31
32
33
34
35
36
37
38
39
40
41
42
43
44
45
46
47
48
49
50
51
52
53
54
55
56
57
58
59
60
61
62
63
64
65
66
67
68
69
70
71
72
73
74
75
76
77
78
79
80
81
82
83
84
85
86
87
88
89
90
91
92
93
94
95
96
97
98
99
100
101
102
103
104
105
106
107
108
<
form
action
=
"
{%
url
 'polls:vote' question.id %}
"
method
=
"post"
>
{%
csrf_token
 %}
<
fieldset
>
<
legend
>
<
h1
>
{{ question.question_text }}
</
h1
>
</
legend
>
{%
if
 error_message %}
<
p
>
<
strong
>
{{ error_message }}
</
strong
>
</
p
>
{%
endif
 %}
{%
for
 choice
in
 question.choice_set.all %}
<
input
type
=
"radio"
name
=
"choice"
id
=
"choice
{{ forloop.counter }}
"
value
=
"
{{ choice.id }}
"
>
<
label
for
=
"choice
{{ forloop.counter }}
"
>
{{ choice.choice_text }}
</
label
>
<
br
>
{%
endfor
 %}
</
fieldset
>
<
input
type
=
"submit"
value
=
"Vote"
>
</
form
>
有了模板也需要有URLconf和视图,在polls/urls.py中添加一行配置path('<int:question_id>/vote/', views.vote, name='vote'),。在polls/views.py中添加如下视图
1
2
3
4
5
6
7
8
9
10
11
12
13
14
15
16
17
18
19
20
21
22
23
24
25
26
27
28
29
30
31
32
33
34
35
36
37
38
39
40
41
42
43
44
45
46
47
48
49
50
from
 django.http
import
 HttpResponse, HttpResponseRedirect
from
 django.shortcuts
import
 get_object_or_404, render
from
 django.urls
import
 reverse
from
 .models
import
 Choice, Question
def
vote
(
request, question_id
):
    question = get_object_or_404(Question, pk=question_id)
try
:
        selected_choice = question.choice_set.get(pk=request.POST[
'choice'
])
except
 (KeyError, Choice.DoesNotExist):
return
 render(request,
'polls/detail.html'
, {
'question'
: question,
'error_message'
:
"You didn't select a choice."
,
        })
else
:
        selected_choice.votes +=
        selected_choice.save()
return
 HttpResponseRedirect(reverse(
'polls:results'
, args=(question.
id
,)))
注意,当只需提示错误信息时,这里使用render()返回HttpResponse对象,并封装了error_message的值给页面。而当正常处理了POST请求并重定向至其他页面 时,返回的是HttpResponseRedirect对象。reverse()的作用是返回一个想要跳转的URL+参数组成的字符串,对应的是URLconf中的规则。即:将URLconf配置中的path()的name参数和question.id组合起来,最终返回的是/polls/3/results/,并重定向至这个页面。
重写resluts视图、新增polls/results.html模板
1
2
3
4
5
6
7
8
9
10
11
12
def
results
(
request, question_id
):
    question = get_object_or_404(Question, pk=question_id)
return
 render(request,
'polls/results.html'
, {
'question'
: question})


1
2
3
4
5
6
7
8
9
10
11
12
13
14
15
16
17
18
19
20
21
22
23
24
25
26
27
28
29
30
31
32
33
34
35
36
37
38
39
40
41
42
43
44
45
46
47
48
<
h1
>
{{ question.question_text }}
</
h1
>
<
ul
>
{%
for
 choice
in
 question.choice_set.all %}
<
li
>
{{ choice.choice_text }}
 --
{{ choice.votes }}
 vote
{{ choice.votes|
pluralize
 }}
</
li
>
{%
endfor
 %}
</
ul
>
<
a
href
=
"
{%
url
 'polls:detail' question.id %}
"
>
Vote again?
</
a
>
到此为止,投票的功能算是完成了。现在打开Question的detail页面,可以看到选项和投票按钮,此时按下投票按钮后,会进行计数,然后重定向到result页面。如果没有选择任何选项点击提交,可以看到错误信息。
重构代码
这里可以看一下此时views的代码,index、details、results三个视图的代码高度冗余,都是根据url中的参数从数据库中获取数据,然后加载模板并渲染返回。这种交互方式非常多见,Django直接将其配置成通用视图。使用通用视图使得代码更加抽象,但也更加精简。官方文档在此。
这是原视图:
1
2
3
4
5
6
7
8
9
10
11
12
13
14
15
16
17
18
19
20
21
22
23
24
25
26
27
28
29
30
31
32
33
34
35
36
37
38
39
40
41
def
index
(
request
):
    latest_question_list = Question.objects.order_by(
'-pub_date'
)[
:
]
    context = {
'latest_question_list'
: latest_question_list}
return
 render(request,
'polls/index.html'
, context)
def
detail
(
request, question_id
):
    question = get_object_or_404(Question, pk=question_id)
return
 render(request,
'polls/detail.html'
, {
'question'
: question})
def
results
(
request, question_id
):
    question = get_object_or_404(Question, pk=question_id)
return
 render(request,
'polls/results.html'
, {
'question'
: question})
普通视图是一个函数,基于函数的视图,而通用视图是基于类的视图。如下:
1
2
3
4
5
6
7
8
9
10
11
12
13
14
15
16
17
18
19
20
21
22
23
24
25
26
27
28
29
30
class
IndexView
(generic.ListView):
    template_name=
'polls/index.html'
    context_object_name=
'my_latest_question_list'
def
get_queryset
(
self
):
return
 Question.objects.order_by(
'-pub_date'
)[
:
].
class
DetailView
(generic.DetailView):
    model=Question
    template_name=
'polls/details.html'
class
ResultsView
(generic.DetailView):
    model=Question
    template_name=
'polls/results.html'
同样的,URLconf也需要调整
1
2
3
4
5
6
7
8
9
10
11
12
13
14
15
16
17
18
19
20
21
22
23
24
25
26
27
28
29
30
31
urlpatterns = [
    # 前三个调整为通用视图xxxView.as_view(), DetailView url参数改成了pk
    path(
'index/'
, views.IndexView.as_view(),
name
=
'index'
),
    path(
'<int:pk>/'
, views.DetailView.as_view(),
name
=
'detail'
),
    path(
'<int:pk>/results/'
, views.ResultsView.as_view(),
name
=
'results'
),
    path(
'<int:question_id>/vote/'
, views.vote,
name
=
'vote'
),
]
通用视图也分为两种:
- ListView:显示一个对象列表。这里可以用在
index视图中,index需要返回前5个question - DetailView:显示一个特定类型对象的详细信息页面。这里用在
detail和result上
通用模型的共同点和不同点
- 都需要手动配置模板名称,他们都有默认的配置,但建议是根据实际路径手动配置。
- 都需要配置context,即之前
render()所传到页面的数据。但ListView使用context_object_name手动指定变量名,而DetailView则无需指定,Django自动选择变量名 - 都需要配置
model,但DetailView需要显式配置,而ListView看起来无需显式配置,直接在函数中返回model结果集
引入资源
配置css
添加css文件
创建目录和文件:polls/static/polls/style.css
1
2
3
4
5
6
li
a
 {
color
: green;
}
在模板文件中引入
在polls/index.html中引用
1
2
3
4
5
6
7
8
9
10
11
12
13
14
15
16
{%
load
 static %}
<
link
rel
=
"stylesheet"
href
=
"
{%
static
 'polls/style.css' %}
"
>
重启即可看到列表项变成了绿色,css样式表起作用了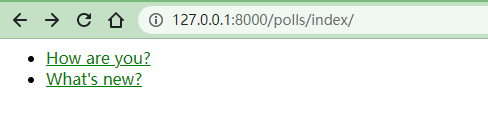
配置静态文件
创建目录和新增图片文件 :polls/static/polls/images/background.png
在css中引用图片
1
2
3
4
5
6
7
8
9
body
 {
background
: white
url
(
"images/background.png"
) no-repeat;
}
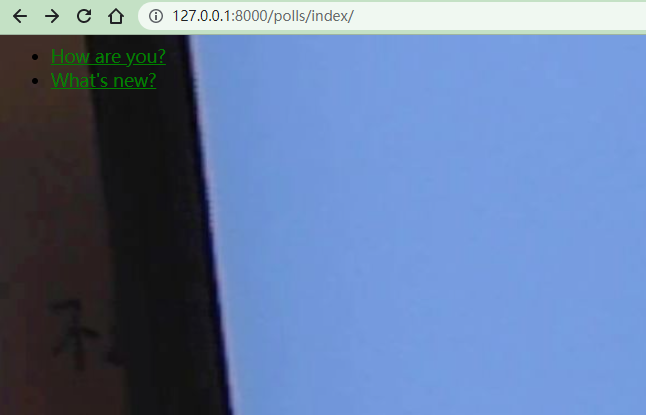
后台美化
自定义表单
按字段集显示并调整顺序
在polls/admin.py中调整注册模型的代码。fieldsets列表中第一个元素为字段集标题,后面的元素均为其他字段集+显示的内容,如下图所示。
1
2
3
4
5
6
7
8
9
10
11
12
13
14
15
16
17
18
19
20
21
22
23
24
25
26
27
28
29
class
QuestionAdmin
(
admin
.
ModelAdmin
):
    fieldsets = [
        (
None
,               {'
fields'
: ['
question_text'
]}),
        ('
Date
information'
, {'
fields'
: ['
pub_date'
]}),
    ]
admin.site.register(
Question
,
QuestionAdmin
)
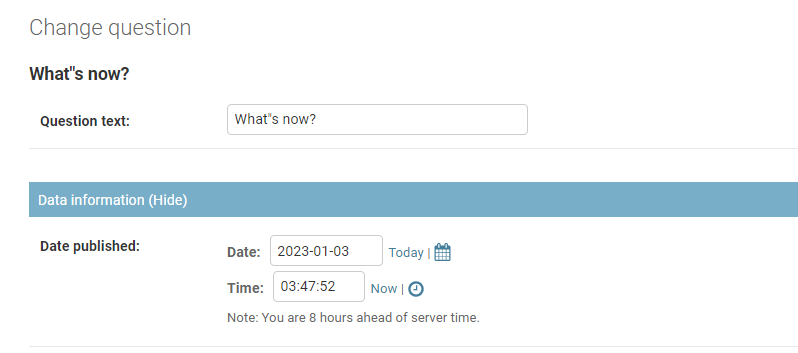
显示关联数据
TabularInline表示以表格形式展示关联对象
添加的ChoiceInline有两个类变量,model表示关联的模型,extra表示默认提供3个选项字段。如下图所示
1
2
3
4
5
6
7
8
9
10
11
12
13
14
15
16
17
18
19
20
21
22
23
24
25
26
27
28
29
30
class
 ChoiceInline(
admin
.TabularInline):
    model = Choice
    extra =
class
 QuestionAdmin(
admin
.ModelAdmin):
    fieldsets = [
        (
None
, {
'fields'
: [
'question_text'
]}),
        (
'Data information'
, {
'fields'
: [
'pub_date'
],
'classes'
:[
'collapse'
]})]
    inlines = [ChoiceInline]

调整列表页
在polls/admin.py中调整QuestionAdmin。list_display用于控制列表页显示的字段,list_filter是列表页面右侧的过滤器,这里设置了pub_date字段为筛选器字段。search_fields是列表页顶部的搜索框,这里会通过模糊查询的方式搜索question_text字段查询。
1
2
3
4
5
6
7
8
9
10
11
12
13
14
15
16
17
18
19
20
21
22
23
24
25
26
27
28
29
30
31
32
33
34
35
36
37
38
39
40
41
class
QuestionAdmin
(admin.
ModelAdmin
):
    fieldsets = [
        (
None
, {
'fields'
: [
'question_text'
]}),
        (
'Data information'
, {
'fields'
: [
'pub_date'
],
'classes'
:[
'collapse'
]})
    ]
    inlines = [
ChoiceInline
]
    list_display = (
'question_text'
,
'pub_date'
,
'was_published_recently'
)
    list_filter = [
'pub_date'
]
    search_fields = [
'question_text'
]
was_published_recently显示的是模型本身的函数名字,可以通过display()装饰器来调整,在polls/models/py的was_published_recently函数上添加装饰器。
1
2
3
4
5
6
7
8
9
10
11
12
13
14
15
16
17
18
19
20
21
22
23
24
25
26
27
from
 django.contrib
import
 admin
class
Question
(models.Model):
    @admin.display(
        boolean=
True
,
        ordering=
'pub_date'
,
        description=
'Published recently?'
,
)
def
was_published_recently
(
self
):
        now = timezone.now()
return
 now - datetime.timedelta(days=
) <= self.pub_date <= now
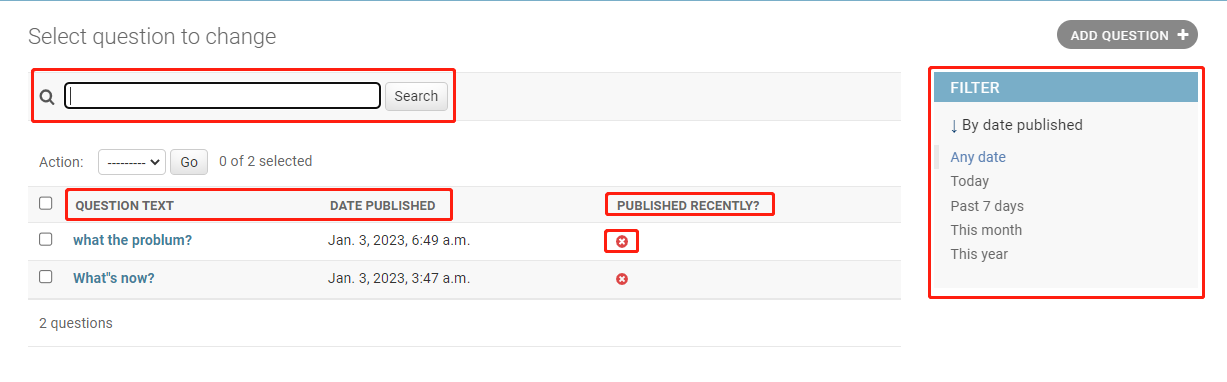
自定义后台界面
通过命令查询django的源码位置,后台界面的静态文件就放在这里
1
2
3
python -
c
"import django; print(django.__path__)"
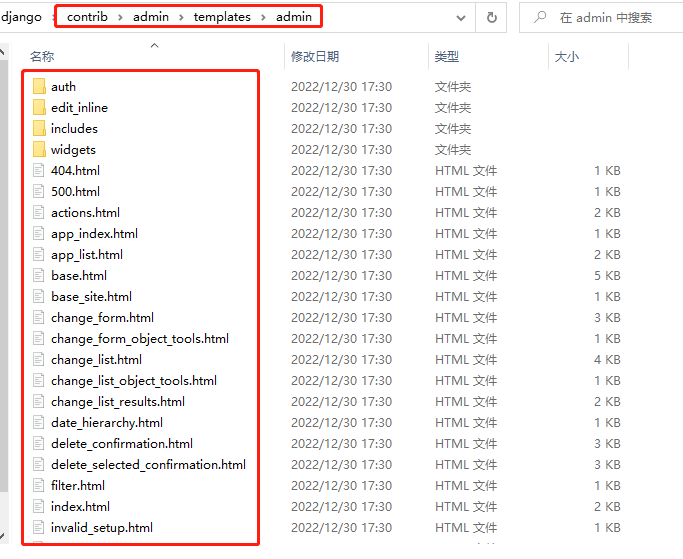
如果想修改后台界面,当然不能直接修改这些源码,应该是新建一个模板目录,将想要修改的文件从源码里复制一份到新目录中,在新目录中修改之后,更改设置文件中的配置。
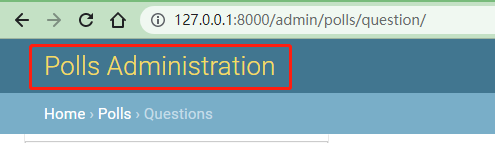
如下,首先在项目目录内(即manage.py所在目录)新建templates/admin的目录,将Django源码模板目录中admin/base_site.html复制到新建的templates/admin/下。并将 {{ site_header|default:_('Django administration') }}这段代码替换成Polls Administration,Django会优先读取当前文件的模板,这样就替换了左上角的LOGO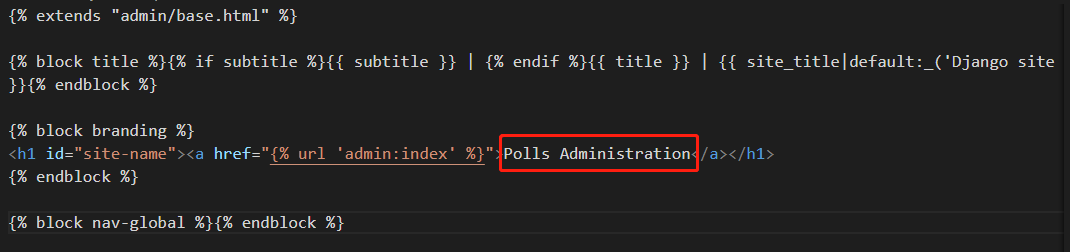
如果模板文件中带有引入其他css文件或者页面,同样在源码模板目录中找到对应的文件复制过来即可修改。如下的index.html,引入了admin/css/dashboard.css,在新模板目录添加相同的文件即可。
1
2
3
4
5
6
7
8
9
10
11
12
13
14
15
16
17
18
19
20
{%
block
 extrastyle %}
{{ block.super }}
<
link
rel
=
"stylesheet"
href
=
"
{%
static
 "admin/css/dashboard.css" %}
"
>
{%
endblock
 %}

除了第五部分自动化测试,Django官网教程基本结束,看了两遍,终于基本弄明白了,接下来就是上手写项目了。